Posts

Showing posts from January, 2021

Thin coats and tape

Image
 Here's an example of doing a thin coat and placing tape.  In this case the thin coat lets the whit eprimer show through.  This is the shaft of an arrow and I want it to look like wood. The tape is reused from another project but with 10 pressure rolls with the walpaper seam roller it will seal just fine. 

Barn Quilt Resources.

I will post links to barn quilt training materials and resources. Iowa Extension Service  https://columbia.extension.wisc.edu/files/2018/08/BQ-Instructions-Columbia-County.pdf DIY Network   https://www.diynetwork.com/how-to/make-and-decorate/crafts/how-to-make-a-framed-wood-barn-quilt

Thin coats of paint.

Image
 I don't recall when I first heard it, but when painting barn quilts you should start with very thin coats of paint.  My friend Beth suggests that you should be able to see through your first and second coat and let the third or fourth coat be the fillers. This process helps prevent bleed under the tape and the paint dries quickly.

Tangled squares.

Image
This one took some time.  I needed some touch ups but came out nice!  

Tools needed to create barn quilts.

 In no particular order: Paint Brushes.  Foam brushes are fine for smaller quilts. Wallpaper seam roller Toothpicks for touching up Paint.  Dutch Boy Max Bond (Manards)is my favorite, 4 oz samples. Sherwin Williams is great but is sold in quarts, not samples. Fusion is a specialty. great to use, limited colors. Dealers nation wide. Polyacrylic sealer - optional. Used to coat the surface when the quilt is finished to prevent UV fading. Razor blades or exacto knife. Rulers:  I use an 18" drafting ruler and a 24" (broken) yard stick. Tape measure.  If you're not familiar with what all those little divisions are take the time to learn. Patience, grasshopper. Pencils Paper towels More to follow.

Work bench vs kitchen table.

Image
 I'm not saying that you can't do barn quilts at the kitchen table, but a dedicated work space can be a real blessing. A friend gave me a fold-up work bench with a couple clamps 5 years ago. It has been handy for many projects and works great for barn quilts. I can clamp the board to the tabletop and paint to my heart's content.  All I really have to do is rotate the work as I finish sections to put a new section in the best place for my right-handed painting. The kitchen table is convenient for creating layouts and taping, but I need to pack everything up before each meal. Kitchen Tabletop Work bench. I know it's cluttered, but can you see the surface clamp at the top center?

In process...

Image
 

How many brushes?

Image
A friend had given me a "starter kit, since she had quit barn quilting. Then I bought 2 dozen on Amazon.  It's handy to be able to paint several colors without having to go to the sink to wash a brush between colors.  

First group of Barn Quilts!

Image
This is where I am after about three weeks.  4 more are in the garage in-process.  Most of these are 17x17, which had to do with my plywood supply.  Those I could put in the kitchen oven for about an hour to dry the paint.  Be certain to start with something very simple and try new things as you get some practice.  
Image
Taping can be tedious!  Just keep at it and the results will be rewarding... imagine building a pyramid  that could take 100 years.   This is pretty simple. The razor blade knife and wall paper roller are about all you need.  This photo shows 1" tape.  I prefer 1/2" but this is what I found in the garage.  Have fun!   
Image
Getting rid of pencil marks before putting down the paint is important.  The graphic can bleed through to the surface with many paints.  I use a soft eraser and then a Mr Clean sheet or sponge.  That works pretty well.   Have fun!  
Image
This is one MUST HAVE tool!  The wall paper roller.   Any time I am putting down tape I roll it at least ten times.   This minimizes the bleeding of the new paint leaking out under the tape.  The tape can be reused several times so that conserves tape. Even with this... there will likely be some touch-up to be done. I have been touching with foam brushes but others use toothpicks to dap into (onto?) the leaks.  I'm about to try that with one particular pattern.]]Have fun!  
Image
Picking a design is easy... there are thousands out there. etsy is a good place to start. this is my 5th design. 8 squares creating a star.  Most of these designs start with diagonal lines from the corners and then a vertical and horizontal through the center.  Sometimes there is a little guesswork, but it's all art.  Nothing is likely to go wrong.   At first I worried about what colors to use. Having looked at hundreds, if not thousands of quilts, I learned that pretty much anything goes.  This one will have light blue corners and red and pink diamonds.  Should be interesting. Have fun!

ways to begin

Image
 Keep in mind... this is how I do it.  It's not manditory, just from lots of experience working on houses... I start by sanding the edges of each board.  100-150 grit sand paper. This gets rid of the loose stuff and gives you a splinter free edge to work with. Next I seal each piece, both sides, with Zar or  Thompson's Water Seal.  This helpes keep moisture from creeping in nd lifting your paint. Then the last step op prep is to prime the wood.  I use about anything I can find that is white.  I have talked to paint stores and they tell me there is almost no difference between interior and exterior paints. More to follow.  

From the beginning

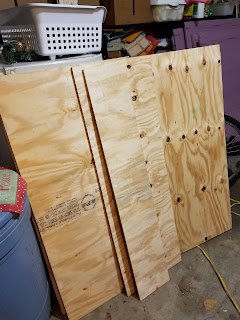
 Please keep in mind,,, these blogs update at the top, so the bevinning of the story is at the bottom. Let me walk you through creating a quilt, starting with the wood.  I'll come back and add photos as they get transferred to my computer. This morning I went to the lumber yard and purchased a 4'x8' piece of 1/2" thick CDX plywood.  The surface isn't perfect, but it's not expensive ($28) including being cut into sections.  Once I make a few cuts  I will have one 48" square panel, 2 24" square panels, 3 16" panels and , if I decide to go that far, 6 8" square panels. First step is applying waterproof sealant. This may be overkill, but helps assure the plywood will weather well.  Tomorrow I will apply a primer (any old exterior grade house paint) and apply painter's caulk to the edges.  That creates additional water seal at the exposed edges. More to follow. 

Beginning at barn quilting

Image
 Today is January 10, 2021. I just started doing barn quilts about three weeks ago. There is so much to be learned from the internet, and a friend gave me a "starter kit" with a few paints, brushes and an eraser.  I have used then all and aded almost every day. My first quilt came out s 16x16" based on a couple plywood shelves I had laying in the garage.  I have no idea where they came from.  1/2" plywood. I started, based on life experiences, by coating them with a waterproofing. I used ZAR, although Thomsons deck waterproofing would do the same thing.  I'd like to be using CDX exterior plywood, but this was available.   I yielded 2 19x19 pieces and 2 16x16 panels.  Using patterns found on the internet, I started laying out and painting.  My first pattern I drew on paper to be certain I new how it would go together.  Trying to stick to simple barn quilt patterns while I get started. At this point, my fourth quilt is coming together, although I'm working on

Barn Quilt process photos.

Image
Circle stencil to be added to red diamond quilt. First official quilt. Waterproofed plywood.